 Conforming Clothing
Ever wonder how to make clothing models conform to a Poser figures? If you have a clothing model built and are trying to make it conform, this is the tutorial for you. This covers creating the figure file inside poser and how to set the joints so it will conform to your target character.
Poser Skill Lever Advanced Intermediate.
You should already be able to create a Poser figure. This will take you to the level of making a conforming figure.
This tutorial was developed on a PC, Windows 98. The primary software is Poser4. The techniques discussed here may work on other platforms but I can't be sure. You will also need a 3D modeler that can handle OBJ files. You may also need some OBJ utilities like the OBJ scaler from MAZ at Sandy Lodge. If you use 3DMax, there are some great plug-ins at HABware. Poser's OBJ files are at a very small scale. These utilities can be used to create scaled up OBJ files for modeling. Then to reduce the OBJ before importing it into poser
There's little point in me covering creating clothing figures here. Several excellent tutorials have already been written in that subject. What I'm going to cover here is how to make a clothing figure conform to a Poser figure.
Figures are based on OBJ files. the basis of your Conforming figure should be that type of file. The data in the .OBJ needs to be right before we begin.
The format of the data in the .OBJ file is very important to producing a successful conforming figure. When you create your clothing figure use the .OBJ file from the runtimegeometries folders as the manikin for your future conforming clothing. This will insure that the clothing is in the correct location in 3D Poser Space to conform. DO NOT use an .OBJ exported from a character. The clothing will be in the wrong location in Poser space and will never conform right. Most Poser characters are offset from the location of the .OBJ. The clothing must have the same positioning as the characters's .OBJ.
The names of the body parts is important too. They must be named exactly as the parts in the .OBJ of the figure you intend to conform to. Don't use the character body parts as a guide, they can be changed in the CR2 file. For example, the left shoulder must be "lShldr" the Poser manual has all the body part names spelled out for standard poser figures. If you are creating clothing for a custom figure, you may want to look inside the .OBJ file with a text editor to see the real names for all the parts.
OK. we have an .OBJ file with all the right names for the parts, and the parts line up with the .OBJ for the "Conform to" or target character. Now let's make it conform!
The first 5 steps are covered pretty well in the manual.
1. Import the .OBJ into poser. Be sure to un-check all the options in the import box.
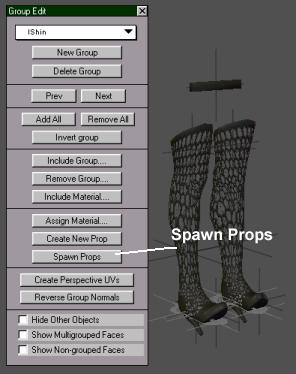
2. Use the grouping tool to "Spawn props" for all the body parts.
3. Delete the original imported .OBJ prop
4. Use the Hierarchy Editor arrange the figure. Be sure to match the rotation order of your conformer the your target character.
5. Create a the character.
You don't have to use this technique to create your character. If you use the "Old" way with PHI files that will work too. Be sure the OBJ files line up properly and the the figure's body parts are named properly. Now we make it conform!
6. Start a new scene in Poser. Load the Target figure from the library. Turn all the IK chains off for the Target figure.
7. Load the figure you created in step 5. This will be our Conformer. Be sure the Conformer is selected and choose Figure>Conform to from the menus. Choose Figure 1 or what ever the Target figure is called. When you click OK, the conformer will probably wad up in a little ball and fly up in the air or something. It's not a conformer . . . yet.
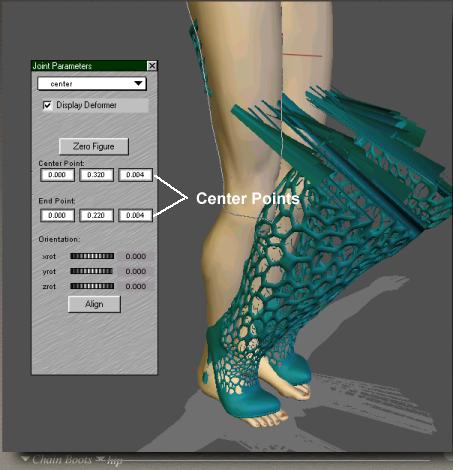
8. Open the Joint Editor from the Window menu. Select the hip (or closest body part to the hips) of the Conformer. In the Joint editor, select Center. In the 3 Coordinate boxes enter the EXACT coordinates of the same body part of the Target figure. Don't try to place the center using the mouse to drag it. This requires more precision than the mouse can afford. If your conformer's body part has an "End Point" and the Target doesn't, use the End Point from the next joint down. If, for example, you were doing a skirt and the conformer doesn't have shins, the thighs would need end points. Use the centers for the shins as end points for the thighs. I've included a table with the joint centers for the P4 Nude Female at the bottom of this page.
9. Set the center for each body part of your conformer.
The conformer should now match the target pretty close. Try moving it. YIPES! It looks terrible. Now comes the tedious part. The more time you spend on the rest of the steps the better you conformer will work. Each joint must be setup to match (or nearly match) the target figure. On the bright side. You only have to do the joint setup for one side. You can use symmetry to copy the joint setup from one side to the other.
10. This is a good time to rename some things. I'd save things here too. Use the Hierarchy Editor to rename all the body parts of the conformer to match the names of the Target. (I have no idea why Meta gave the .CR2 files different body part names than the .OBJ) You don't have to do this but it makes the joint setup a little easier.
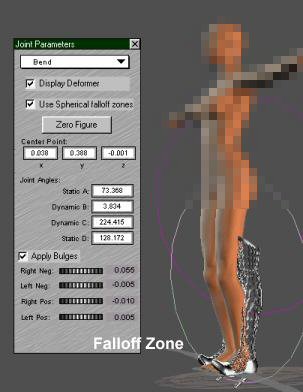
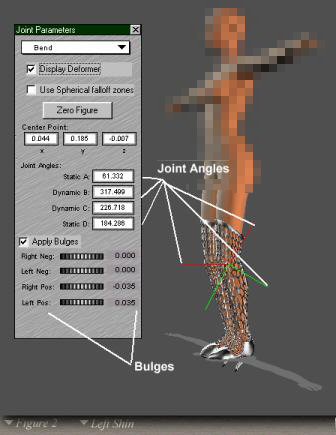
11. Select a body part from the conformer. Select the first rotation from the list. Y Rotation if it is a thigh like our boots. Now switch to your Target figure. Write down (or if your good remember) the joint twist start and end points. Switch back to the Conformer and type in the values. Since this is a hip, it has Spherical Falloff Zones. These need to be setup too.
12. Switch back to the Target. Select the InnerMatSphere. Select copy from the Edit menu or press ctl+C.
13. Switch back to the Conformer. Be sure the correct body part is still selected then put the check in "Use Spherical falloff Zones". Select the InnerMatSphere. Select paste from the Edit menu or press ctl+V
14. Repeat 12 and 13 except select the OuterMatSphere.
15. Repeat 11 - 14 for each of the 3 directions of rotation. On the Side-Side and Bend rotations, you will need to copy the 4 joint angles. Also note if bulges have been used. You may want to copy them.
16. Repeat 11-15 for each joint on one side, right or left, in the Conformer.
17. Be sure the conformer is selected. From the figure menu choose symmetry left to right (or right to left depending on which side you did. DON'T GO THE WRONG WAY) When prompted to copy joint setup answer YES.

18. Save your conformer to the library.
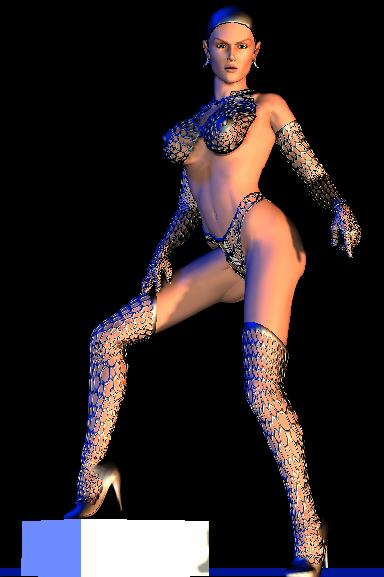
| The conformer will work basically at this point. Now is the time to start tweaking dials and fiddling with falloff zones. Like I said, the more time you spend the better it will work. Remember you only have to do one side. Just copy it with symmetry to the other side. Bend the Target all around. When you see a problem fiddle with the bulges, and angles to make it work. Occasionally you will need to move the joint centers on the Conformer. A little does a lot. Move it 1 or 2 thousandths at a time This is by no means the only way to create conforming clothing. I have had great success using the techniques here. I also use the techniques shown by PhilC, PaulH and Roy Riggs. Chayne Lynx Armor is all conforming figures. There are 4 conforming figures. The Gloves, The Top, The bottom, and the boots. They were all conformed using the techniques explained here. Happy Modeling! |
|
P4 Nude Female Joint Centers
| hip Center | 0.000 | 0.400 | 0.000 |
| hip End | -0.038 | 0.388 | -0.001 |
| abdomen | 0.001 | 0.425 | -0.002 |
| chest | -0.003 | 0.492 | -0.010 |
| neck | 0.000 | 0.608 | -0.015 |
| head center | 0.000 | 0.621 | -0.013 |
| head end | 0.000 | 0.709 | -0.013 |
| lCollar | 0.042 | 0.579 | -0.010 |
| lShldr | 0.060 | 0.575 | -0.012 |
| lForeArm | 0.183 | 0.573 | -0.018 |
| lHand center | 0.283 | 0.575 | -0.011 |
| lHand end | 0.311 | 0.575 | -0.011 |
| rCollar | -0.042 | 0.579 | -0.010 |
| rShldr | -0.060 | 0.575 | -0.012 |
| rForeArm | -0.183 | 0.573 | -0.018 |
| rHand center | -0.283 | 0.575 | -0.011 |
| rHand end | -0.311 | 0.575 | -0.011 |
| lThigh | 0.038 | 0.388 | -0.001 |
| lShin | 0.044 | 0.185 | -0.007 |
| lFoot | 0.043 | 0.026 | -0.011 |
| lToe center | 0.050 | 0.008 | 0.040 |
| lToe end | 0.050 | -0.002 | 0.072 |
| rThigh | -0.038 | 0.388 | -0.001 |
| rShin | -0.044 | 0.185 | -0.007 |
| rFoot | -0.043 | 0.026 | -0.011 |
| rToe center | -0.050 | 0.008 | 0.040 |
| rToe end | -0.050 | -0.002 | 0.072 |
| | | | |


0 comments